Make Email View Bigger !!
How do you make the e-mail screen bigger to make it easier to
The windows e-mail screen is too small, can i make just that page bigger to make it easier to read. I don't know much about these things. This thread is locked.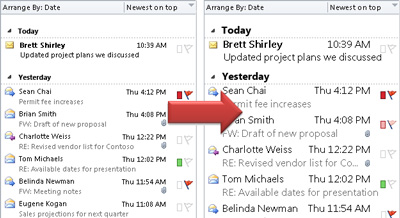
How to Make the View in Outlook Larger | Small Business - Chron.com
How to Make the View in Outlook Larger. Do you find yourself squinting at the screen while checking your email? Straining to read small text in Outlook can make responding to emails stressful and Do you ever find yourself having a hard time reading your email in Outlook because of the font size or type? When you have a hard time seeing the text in Outlook, it can translate into having a hard time communicating with your clients or generally reading and writing emails. It helps to understand Outlook settings and be able to manipulate them to change the view size in Outlook where it is easier for you to work.The thing about Microsoft Outlook is that the default font is set to either Arial or Calibri, both of which are small by default. This might not be your preference. If that is the case, then you can change the size of text in Outlook to something you would prefer. In this case, your only limitation is the fonts that are available in your system itself. The instructions in this article work for Outlook 2010 through Outlook 2019, including Outlook for Office 365.
Start by opening Microsoft Outlook. In the program window, go to the File tab and click on it. Beneath it, you will find a range of options. Click on the one labeled “Options.”
On the left-hand side, you will find a bunch of categories. Select the one labeled “Mail,” and another set of options will appear on your screen.
You will now be able to change fonts in a variety of sections. Under each section you want to change, simplyselect the option labeled “Fonts.” The section labeled “New mail messages” allows you to change Outlook inbox font size. The section labeled “Replying or forwarding messages” enables you to change the font that appears whenever you forward an email or respond to it. The section labeled “Composing and reading plain text messages” allows you to change the appearance of plain text messages, but only from your own perspective. When you send plain text messages to others, they will still receive them in the plain text format.
In case you have already set up a stationery or theme you can select the “Theme” button. In case you want it turned off, you can simply disable it with a click.
Now that you are in the Font area, you can choose the font you prefer. You can actually choose a lot more than the font type here. You can also choose the style with which the font is applied, its size, color, and also the effect as to how it appears.
Once you have chosen all the font features, you would like to see in your Outlook; you can apply them by clicking on the button labeled “OK.” This finishes the whole process. However, you will have to click on OK again in order to exit the window labeled “Signatures and Stationery,” as well as the options window in Outlook.
In case you’re running Outlook in an older version, such as the 2003 and the 2007 versions, there is a broadly similar process you can use to change the font features in your view.
Go to the tab labeled “Tools” and click on it. Once you open it, then click on the button labeled “Options” to open the options menu.
Now click on the tab labeled “Mail Format.” This will open a dialog box that allows you to select more options.
Once again, you will have a bunch of sections to edit. In this case, the most important sections to edit are the “New mail messages,” “Replying or forwarding messages,” and the “Composing and reading plain text messages” sections. Click on the “Fonts” option under each of these sections so you can edit font features for all of them. This process works for Outlook 2007. For Outlook 2003, the process is slightly different: you will click on the option labeled “Choose Font” for the sections labeled “When composing a new message,” “When replying and forwarding,” and “When composing and reading plain text” sections. This allows you to change font features for each of these sections.
Once you're in, you can select all the font features of you want. You can select the type of font you want, t_he style_ you want as a display font;the size you want, the effects you apply; and also the font's color. You have full control over the text's appearance in your messages.
Once you have finished editing your fonts, click on the button labeled “OK” for O_utlook 2007_. For Outlook 2003, there is a little thing you should look out for. There is often an option labeled “Use this stationery by default.” If that button is checked, then the stationery set as the default for that section will be used and will override whatever changes you have made to the font. You can change this in one of two ways. You can modify the default stationery itself, so that it reflects your preferences, or you cantell Outlook to ignore everything specified in the default stationery.
The default fonts you have selected - and their respective features - should now show on the sections where they were changed.
You can also change the way messages appear by default on Outlook.com, which is the online version of Outlook. The process for changing the way outgoing messages look in Outlook.com is pretty simple. Remember, you won’t be able to change the way messages look when you’re reading them on the website, as you could do on the software versions o_f the application. However, you can change the font_ on the messages that you send.
Start by going to Outlook.com and opening your account on the site. Head over to settings and then click on “View all Outlook settings.” A menu will appear with a variety of options.
You will find a list of options next. One of them is “Message format.” Under it, you will find an option labeled “font dropdown.” Click on it and then choose the new font you want to use for your outgoing message. You should also be able to change other things, such as the size of the font, its styles (if you want it in italics, underlined*, bold, and so on)*, and also the color of the font.
Now any new messages that you compose on the website Outlook.com should use the font settings you have set as the default.
As a general tip, you can also change the settings of an individual message while you are still composing it. Go to the bottom of the composition window and find the different options that enable you to change the way your font appears. These settings will only be applied to the email that you are currently composing.
Nicky is a business writer with nearly two decades of hands-on and publishing experience. She's been published in several business publications, including The Employment Times, Web Hosting Sun and WOW! Women on Writing. She also studied business in college.
How do i make the message preview bigger in outlook? - Microsoft Community
Replied on March 30, 2021. I see. try to change the Message Preview from Off to 1 or 2 or 3 lines. 1. Go to View tab. 2. Under the Arrangement section, click Message Preview. 3. Please select "1 line" or "2 lines" or "3 lines". Report abuse.:max_bytes(150000):strip_icc()/001-how-to-display-messages-in-a-larger-font-in-mac-os-x-mail-2ea272e017084d9cb03d5ea16eaddbdd.jpg)
Make Text Bigger for Reading in Mail for Windows 10: Here's How - La De Du
Select Settings from the menu. Windows 10 keyboard shortcut: You can also press Windows I to open the Windows Settings window. Open the Ease of Access category. Now go to Display (under Vision). Use the slider under Make text bigger to increase the size of Sample text until you can comfortably read it. Tip: Try 135%. Frustrated with tiny text in emails that is impossible to read? Find out here how to enlarge email text for reading in Mail for Windows 10.When sketching, one rule of thumb (and index and middle finger) is to make people around eight heads tall: a little less than four heads for the lower body, a wee more than three for the upper and one head for, well, the head.
To quickly zoom in on any message that has particularly small text or image content in Mail for Windows 10:
This will zoom in on the message laid out as is. You can use the scrollbars or mouse or trackpad scrolling to move around in the message.
To enlarge the Windows 10 interface and have Mail lay out messages with a larger font (and larger images) so they still fit in the space allotted to them so you do not have to scroll horizontally like mad:
No, you have to zoom in every time anew — or, of course, use Windows preferences to change the display font size.
The general Windows 10 text zooming (or all-around interface scaling) will make text in emails bigger as you write them, too.
You can change the interface size and zoom level only across all Windows 10 applications and the operating system itself. You can, however, zoom in to a message’s content right in Mail for Windows.
How to Make Outlook Email Text Bigger | Bizfluent
To make Outlook email text bigger and easier to proofread, zoom in on specific messages that you want to read and check. To make the text of columns larger, click the “View Settings” command in the View ribbon. Click the “Other Settings” button and click on the “Column Font” button to choose a larger font for columns. Outlook 2013 provides the ability to change the size of the text. You might want to make Outlook email text bigger if the text is too small for you to read clearly or you want a larger view to proofread your message with extra care.To make your text larger, choose a larger font size for text in messages you send. For example, select some phrases to make those words bigger for emphasis or increase the size of all text in the message. Press "Ctrl-Shift->" to enlarge selected text. Anyone who views the message as plain text won't see the type in the desired size.
To adjust your view, click the “Zoom” command in the Message ribbon and select a larger percent. This action changes the size of the contents in the messages you compose. To make Outlook email text bigger and easier to proofread, zoom in on specific messages that you want to read and check. To make the text of columns larger, click the “View Settings” command in the View ribbon. Click the “Other Settings” button and click on the “Column Font” button to choose a larger font for columns. Click the “OK” button to save this change.
Tara Duggan is a Project Management Professional (PMP) specializing in knowledge management and instructional design. For over 25 years she has developed quality training materials for a variety of products and services supporting such companies as Digital Equipment Corporation, Compaq and HP. Her freelance work is published on various websites.

Create, change, or customize a view - Outlook
On the View menu, point to Current View, and then click the view that you want. On the View menu, point to Arrange By , and then click Custom . Click Other Settings . Views give you different ways to look at items in a folder. Each Outlook folder, such as Inbox and Calendar, allows you to customize your view to change the organization of items, fonts, and many other settings.The most common change to make to a view is to change the font size in the message list, the Reading Pane, or when composing a message.
Note: To change the font size of the message preview, sender name, and subject in the default Inbox view, choose Row Font.
Select the font, font style, and size you want, then click OK three times to save your settings and apply your changes.
Note: If you only want to change the font or font size for the message preview (the line of message text you see under the subject and sender, select Font under Message Preview.
The Reading Pane doesn't allow you to change the default font or font size. However, you can zoom in or zoom out easily. You can also tell Outlook to display all of your email messages in plain text, and have more control over the font size.
If you're an Microsoft 365 subscriber, you can select a zoom percentage that persists across all of the messages you read.
At the bottom right corner of the Reading Pane, click the percentage (usually 100%) to display the Zoom While Reading dialog box.
Choose one of the default percentages or enter your own percentage. Select the Remember my preference checkbox to keep your zoom level the same across all messages you receive.
If you're not an Microsoft 365 subscriber, the Zoom percentage will not save from one message to the next. Every time you switch messages in the reading pane, you'll need to zoom in or out. To change your zoom percentage, use the following steps.
To zoom in or out in the Reading Pane, look for the magnification slider at the bottom right corner of the Reading Pane.
Note: Any change you make to the zoom level only persists while you're viewing the message. If you select a different message, the zoom percentage will return to 100%. If you click back to the first message, the zoom percentage isn't saved.
Select the Font button for New mail messages or Replying or forwarding messages to change the default font, font size, and font color when composing or replying to messages.
Sometimes, it's easier to start with a brand new view rather than modifying an existing view. You can create a new view in any Outlook folder.
Note: If you want to start from an existing view, in the Manage All Views dialog box, select and then select Copy.
Under Can be used on, accept the default setting of All Mail and Post folders or choose another option, and then choose OK.
In the Advanced View Settings: New View dialog box, choose the options that you want to use, and then choose OK.
Table A table view shows your information in rows and columns. This is one of the most effective views for email messages.
Timeline A timeline view shows your items along a fixed timeline. It's useful for tasks or for folders that contain a small number of items spread out over a period of time, for example, a collection of twenty emails for a specific project.
Card Card views are typically used for contact folders. In a card view, you'll see a variety of fields that apply to each item, whether they're filled in or not.
Business Card Business card views are typically used for contact folders. In a business card view, you only see fields that contain data.
People A people view is a view of your contacts that doesn't show the same level of detail you see from Card or Business card views. You'll see a list of your contacts with their name and photo.
Day/Week/Month A Day/Week/Month view is typically used for Calendar folders, but you can use it for email folders as well.
Icon An icon view shows your items with an icon and their subject. This view is useful for folders with few items or for notes folders.
For each type of change that you want to make, click a button, and then select the options that you want. For example, if you want to add or remove columns, click Fields (columns are also known as fields). Then add or remove fields, or create a custom field.
Note: All programs on your computer that use date settings from your operating system will be affected by the changes that you make in Control Panel.
If you are using multi-line layout and have added several fields to your view, you may need to increase the number of lines displayed in multi-line layout to see all the information.
For example, a setting of 80 characters indicates that whenever the list of message headers is reduced to a width of fewer than 80 characters, Outlook automatically displays a two-line preview.
In Contacts, Tasks, and Notes, you can quickly change the current view by using the Customize Current View option in the Navigation Pane.
Note: All Office 2007 programs on your computer that use date settings from your operating system will be affected by the changes that you make in Control Panel.
If you are using multi-line layout and have added several fields to your view, you may need to increase the number of lines displayed in multi-line layout to see all the information.
For example, a setting of 80 characters indicates that whenever the list of message headers is reduced to a width of fewer than 80 characters, Outlook automatically displays a two-line preview.
Note: You can't rename a predefined view, even if you have customized the view. Instead, copy the predefined view, give the copy a new name, and then change the settings.
In the Views for folder folder name box, click the view that you want to be available in other locations.
In the Views for folder folder name box, click the view that you want to change back to its original settings.
Note: If the Reset button is unavailable, you may have selected a custom view or a standard view that has not been customized.
How to Increase Font Size While Reading Outlook Mail
Open a message and go to the Messages tab. Select Zoom, then use the up and down arrows to make the text larger or smaller. In the Reading pane, use the zoom slider or press Ctrl while turning the mouse wheel to increase the font size. If you receive emails with fixed font sizes, use a display lens such as the built-in Magnifier in Windows.How to Make Font Size Bigger or Smaller on Your Screen
For example, to make email text larger and easier to read in Mail, go to Mail > Preferences, choose Fonts & Colors, choose Select next to Message font, and then select a font size. In Messages, go to Messages > Preferences > General , and then move the Text size slider to the right.How to Manage Your Email Viewing Settings on Yahoo: 12 Steps
Step 1, Go to www.yahoo.com on your web browser. This will bring you to Yahoo's home page.Step 2, Go to Mail. Look at the top left of the screen for a “Mail” button. This is located inside a purple bar. Click on the “Mail” button to access the log-in screen of your account.Step 3, Sign in. Click on the e-mail address box and enter your e-mail address; click on the password box below it and enter your password. After entering both information, click on the “Sign In” button locatedCreate your Google Account
Your current email address We will use this address for things like keeping your account secure, helping people find you, and sending notifications. You always have control over this functionality through your Account Settings. make email view biggermake email view bigger
make a wish nct,make a wish chinese drama,make a wish nct lyrics,make a wish,make a wish nct lyrics english,make a google account,make a wish artinya,make a gif,make america great again,make a google form,email account,email address,email adalah,email akulaku,email account sign up,email anteraja,email apple,email atau e-mail,email account login,email application letter,view artinya,view analytics google form,view analytics,view artinya dalam bahasa indonesia,view artinya apa,view aesthetic,view alam,view accuracy google forms,view anonymous instagram story,view anonymously,bigger artinya,bigger arms workout,bigger and equal sign,bigger album burger,bigger army diplomacy,bigger army 3 lords mobile,bigger atau biggest,bigger and smaller sign,bigger and badder osrs,bigger and blacker
Posting Komentar untuk "Make Email View Bigger !!"