Make Email Private Outlook !!
How to mark email message as private or confidential in Outlook?
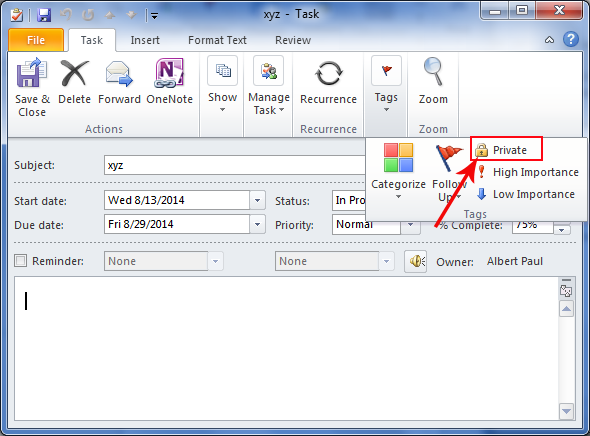
Mark an email message as private or confidential in Outlook. If you want to mark a single outgoing email message as private or confidential, please do as follows. 1. Create a new email message. 2. In the Message window, please click File > Info > Properties. See screenshot: In Outlook 2007, please click the Office Button > Properties. 3. In Microsoft Outlook, you can mark an outgoing email message or all outgoing email messages as private or confidential, which can remind recipients of keeping that message as private. In this tutorial, I will show you how to mark email message as private or confidential in Outlook.3. In the Properties dialog box, please select Private or Confidential from the Sensitivity drop-down list. And then click Close button to exit the dialog box.
In Outlook 2007, please select Private or Confidential from the Sensitivity drop-down list under General tab, and then click OK button.
When recipients received your message, it will display the following information in the email header to remind the recipient to treat this email as Privite or Confidential.
Note: This function is only applied to the current message, if you create another new message and send it, this function will not take effect.
For marking all outgoing email messages as private or confidential in Outlook 2010 and 2013, you can do as follows.
2. In the Outlook Options dialog box, please click Mail in the left pane, then go to the Send messages section, select Private or Confidential from the Default Sensitivity Level drop down list. And finally click OK button. See screenshot:
From now on, when you sending an email message, it will be marked as private or confidential automatically according to your configuration above.
4. In the Advanced E-mail Options dialog box, please select Private or Confidential from the Set sensitivity drop-down list under When sending a message section. And then click OK button.
Mark your email as Normal, Personal, Private, or Confidential - Office
Set the sensitivity level of a message From your draft email message, click File > Properties. Under Settings, in the Sensitivity list, select Normal, Personal, Private, or Confidential. The default value is Normal. However, the Sensitivity level doesn't stop recipients from taking any actions on a message. People who receive your email can take any action on the message that they want to, such as forwarding a confidential message to another person. To restrict the actions that recipients can take on the messages you send, we recommend that you use Office 365 Message Encryption or Information Rights Management (IRM) if they're available in your organization.Note: A Sensitivity level is different from a Sensitivity label. A sensitivity label is a Microsoft 365 feature that lets you apply a label to emails or files so they're compliant with your organization's security policies. For more information on sensitivity labels, see Apply sensitivity labels to your files and email in Office.
To restrict what recipients can do with a message that you send, you have to use Information Rights Management (IRM). Your system administrator must install IRM before you can apply restrictions to an email message. If you don’t see the Permission button on the Options tab, IRM probably isn’t set up.
Important: You can view IRM-protected mail by using Outlook 2013 RT. However, you can’t send mail. Want to see what version of Office you're using?
Outlook sets the Do Not Forward permission (which also prevents printing) and adds the following text to the top of your message:
Important: IRM can’t prevent content from being erased, stolen, corrupted, or captured and transmitted by malicious programs or computer viruses. It also can’t stop people from writing the content out by hand, retyping it, or taking a digital photograph or screen capture of the message.
Outlook has a variety of other permission settings to choose from. To see the list, select the down arrow beneath the Permission button.
Private Email account setup in Outlook 2019 - Email service - Namecheap.com
Click the + Add Account button there. If you have mailboxes set up already, go to File tab >> Info >> Account Information and click the + Add Account button: 3. Type in your full Private Email address and click Connect: Disregard any warnings that may appear, and proceed to the next step. 4.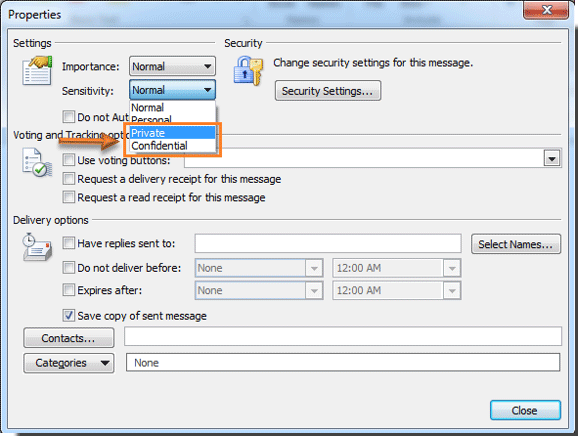
How to add Private Email account to Outlook.com webmail - Email service
This guide describes how to add Private Email account to Outlook.com webmail: 1. Log in to your account here: https://mail.live.com 2. Click on the gear icon on the upper right part of the mailbox page and choose View all Outlook settings: 3. Choose the Sync email option, and click Other email accounts: 4.Using Outlook.com with your own domain or current email address - HowTo
Option 1: Create a new @outlook.com address. To sign up for an Outlook.com account go to https://outlook.com and click on the Create free account link at the bottom of the screen. Fill out the form with the address that you want to use. Follow the instructions to personalize your account and complete the signup process. Did you know that you can set up an Outlook.com account (formerly known as Hotmail) with your own current email address or personal domain and don’t necessarily have to use an @outlook.com address?This allows you to both send and receive emails with an address which you already own, even if it is from another provider such as Gmail.
Using an Outlook.com account is a great alternative for your current POP3 or IMAP account if you want to sync your emails, contacts and calendar items with multiple devices such as your desktop, laptop, netbook, tablet or smartphone. It behaves a lot like a personal (hosted) Exchange or Office 365 for Business account but for free.
Setting this up is relatively quick and easy but there are some pitfalls to notice. This guide walks you through the entire process of setting up an Outlook.com account with your own current email address and how to transfer all your current data.
A Microsoft Account is basically your username to make use of various Microsoft services such as Outlook.com, OneDrive, Xbox and even Windows 8 or Windows 10. This username can be any existing email address you already own or a new Outlook.com address.
If you already have an @outlook.com address, then you can use that one or create a new one. If you already have a Microsoft Account for your current email address, it is important that it also has an @outlook alias configured with it.
Now that you have a Microsoft Account with an @outlook.com address, you can configure a forwarder for your current address to your @outlook.com address.
The benefit of using a forwarder is that your mails will arrive almost instantly in your Outlook.com account instead, even when Outlook itself is closed.
However, this requires proper forwarding support by your current ISP but nowadays most ISPs provide support for this. If your ISP doesn’t offer forwarding capabilities, don’t worry, we can take care of that in Step 4.
You’re done with the web configuring part and now it is time to get everything into Outlook. This is an easy process by using Auto Account Setup.
When you get this screen, fill out your email address and press the Connect button. When you’ve already stored your credentials for this account in Windows, the account will be added directly. If not, you’ll get prompted for your password. When you have Two-Step Verification enabled for your Outlook.com or Microsoft Account, then you’ll also be prompted for additional confirmation such as by entering a code obtained via an SMS text message or the Authenticator app.
When you get the dialog shown above, fill out your name, email address and password. When you have Two-Step Verification enabled for your Outlook.com or Microsoft Account, then you’ll have to use a special App Password instead of your regular password.
When you configure your Outlook.com in Outlook, Outlook doesn’t allow you to actually send as an address that is from a 3rd party provider or a custom domain alias (unless you have it configured as part of Outlook.com Premium via a Microsoft 365 Family/Personal subscription).
When you are using Outlook 2013, 2016, 2019 or Microsoft 365, these type of aliases are still shown in the From dropdown menu, but when you try to send as such an alias, the recipient will see it as;
To prevent this from happening and not show the @outlook.com address, you can add the mailbox of your current address as a Send Only account in Outlook.
To send as your non-@outlook.com address and prevent duplicates in Outlook, you must disable the Receive process of your POP3 account.
With the Outlook.com account now configured in Outlook, you can start transferring your current email, contacts and calendar items to the Outlook.com account so that you can sync them to multiple devices.
Important!Before starting with the transfer, make a good backup of your current pst-file. This way, when things go wrong, you can easily restore your pst-file and start over.
Moving your emails is quite easy; Select all your messages in the Inbox with CTRL+A and move them to the Inbox of your Outlook.com account via drag & drop or use the Move command on the Ribbon. You can also use the keyboard shortcut CTRL+SHIFT+V or right click on your selection to move your messages.
Tip!If you left all your mail on the server, then Outlook.com has also downloaded them. Moving the messages will result in duplicates. To prevent this, empty your Outlook.com Inbox before you start moving emails. When you move the emails, the read/unread/reply/forward status is kept, as well as any assigned Follow Up Flags and Categories.
For messages in other folders, you can directly move the entire folder via drag & drop or by right clicking on the folder and select the Move Folder option. Any subfolders are automatically transferred as well and the folder structure will be preserved.
The easiest way to move all your Calendar items at once is by placing your Calendar folder in a list view such as the All Appointments list view or the By Category view. Once you’ve done that, you can again move them via the CRTL+A and drag & drop method.
Moving your Contacts is similar to moving your Inbox messages; Press CTRL+A to select them all and then move them via drag & drop or one of the other move options available.
To move your Tasks, press CTRL+A to select them all and then move them via drag & drop or one of the other move options available.
When you are storing Notes in Outlook, you can also transfer these via the regular CTRL+A and move options available. However, the Notes feature is no longer being further developed in Outlook and the use of OneNote is recommended. To migrate your Notes from Outlook to OneNote see: Export Outlook Notes to OneNote.
When you were using the Journal, you can transfer the items by placing the folder into the Entry List view and then use the CTRL+A and move options available.
With all your data transferred and Outlook.com automatically collecting your new emails, you can remove your old POP3 or IMAP account from Outlook (unless you are using it as a Send Only POP3 account) and set the Outlook.com mailbox as the main mailbox if it isn’t already.
As mentioned, a big benefit of having an Outlook.com account is that you can sync your Mail, Contacts and Calendar with multiple devices. These devices don’t have to be PCs or laptops but can also be tablets (iPad, Android, Surface, etc…) or smartphones (iPhone, Android, etc…).
It is recommended to use the Outlook app for iPhone and iPad and Android as it supports the most features for an Outlook.com account and it can configure your account without needing to enter any server information.
However, you are free to use any other mail app as well. Most devices have built-in support for configuring Outlook.com accounts but in case you need to do it manually, you can use the following configuration settings to configure is as an Exchange ActiveSync (EAS) account which syncs your mail, contacts and calendar.
If you are using Windows 8 or Windows 10, then you can also configure your Outlook.com account in the Mail, Calendar and People apps to get Lock Screen and Start Screen information about upcoming appointments. For details see: Live Tiles for Outlook on Windows 8.
While the Tasks, Notes and Journal folders sync with other Outlook for Desktop installations, these folders do not sync to all other devices when using Exchange ActiveSync or the Outlook app. You can consider the following alternatives;
TasksTasks syncing via the EAS protocol is supported but many Mail apps, including the Outlook app for iOS and Android, do not sync this folder. Microsoft has developed a separate app called To Do which is dedicated to Tasks management. It uses the Tasks folder in your Outlook.com for storage so everything stays synchronized. You can get the free app for Windows 10, iPhone and iPad, Android or use it in your favorite Internet browser.
NotesThe Notes folder of Outlook can be accessed in the Sticky Notes section of OneNote for iPhone and iPad and Android or by using Microsoft Launcher for Android. Sticky Notes is also available as a separate app for Windows 10. As an alternative, you can also access them with your favorite Internet browser.
JournalThere is no real alternative to the Outlook Journal but you can create an additional Calendar folder and create a new view which is using a Timeline layout. Then you can use Appointments to create “Journal” entries. You could of course also leave it in the Day/Week/Month view for a more diary style Journal. This additional Calendar folder will automatically sync with any Mail app.
When you own a domain (like example.com) and also have a Microsoft 365 Family/Personal subscription, then you can link your domain to Outlook.com so that everyone in your subscription can also use a personalized address with their Outlook.com mailbox (like name@example.com).
The benefit of this method is that you don’t have to configure any forwarder or Send Only POP3 account. You are however limited to only 1 personalized address per Outlook.com mailbox. The Microsoft 365 Family subscription allows up to 6 people with such a personalized address whereas the Microsoft 365 Personal subscription only allows 1.
To set this up, the one managing the Microsoft 365 Family/Personal subscription will have to do this in Outlook.com via;
When you want to host more than 6 email accounts at Outlook.com or want it to handle all the emails for your entire domain, add aliases, distribution groups and shared mailboxes, then switching to Microsoft 365 Exchange Online might be the better solution even though this isn’t free (unless you are a non-profit organization).
When you choose to go this route, you don’t have to configure Outlook.com to collect your mail via POP3 or configure any forwarder; Mail is then being received instantly as if it was a native domain of Outlook.com itself.
The costs depend on the country that you live in but currently a single mailbox costs $4 per month. As the domain owner, this also provides you with lots of management options and you have the additional benefit of being able to share email, calendar and contact folders between your colleagues as well as creating shared mailboxes. You can find out more here: Compare Microsoft Exchange Online plans. (You can switch your language and geographical location at the bottom left of the page.)
A better deal might be the Microsoft 365 Business Basic subscription for $5 per month. In addition to the above benefits, it will also grant each user with 1TB of online storage (OneDrive for Business), Office Online, Teams (online conferencing and collaboration) and a collaboration website (SharePoint based). The Microsoft 365 Business Standard subscription for $12.50 per month also includes the Office apps for Windows 10 and Mac.
Note:Microsoft used to offer “Custom domain management” for Outlook.com via the Windows Live Admin Center (domains.live.com) and later via a standalone Outlook.com Premium (premium.outlook.com) subscriptions. Both offers have been discontinued but previously configured mailboxes will continue to work. The recommendation is to switch to any of the aforementioned Microsoft 365 subscriptions.

Best Free Private Email Providers to Protect Your Data
Using your private email account in Outlook is easy. First, open up Outlook on your preferred device. Then, navigate to Account Information, and click “Add Account.”How to Send Email to Undisclosed Recipients in Outlook
This article explains how to create an Undisclosed Recipients contact in Outlook so you can send an email and keep everyone's addresses private. Instructions apply to Outlook 2019, 2016, 2013, 2010, 2007; and Outlook for Microsoft 365.Outlook.com - Free personal email
Outlook.com is a free personal email service from Microsoft that doesn't scan your email for the purpose of serving you ads. Automatically file emails and share photos easily.Outlook – free personal email and calendar from Microsoft
Expand your Outlook. We've developed a suite of premium Outlook features for people with advanced email and calendar needs. A Microsoft 365 subscription offers an ad-free interface, custom domains, enhanced security options, the full desktop version of Office, and 1 TB of cloud storage.How to Create an Email Group in Outlook
Use Outlook Contacts to Create an Email Group. In the example below, we are going to use the Outlook web to create a contact group. The trick will work on all platforms such as Chrome OS, Windows make email private outlookoutlook 365 make email private
make email private outlook
make a wish nct,make a wish chinese drama,make a wish nct lyrics,make a wish,make a wish nct lyrics english,make a google account,make a wish artinya,make a gif,make america great again,make a google form,email account,email address,email adalah,email akulaku,email account sign up,email anteraja,email apple,email atau e-mail,email account login,email application letter,private adalah,private artinya,private account twitter,private account,private account viewer instagram,private album xiaomi,private and confidential,private army,private address iphone wifi,private album xiaomi miui 12,outlook adalah,outlook artinya,outlook account,outlook app,outlook automatic reply,outlook app for windows,outlook android,outlook anggaran adalah,outlook alternative,outlook auto reply
Posting Komentar untuk "Make Email Private Outlook !!"